Table of Contents
If you’re a fan of both delicious apple pies and creative baking techniques, you’re in for a treat! This Origami Apple Pie Before Fold recipe brings a fun twist to a classic favorite, combining a flaky, golden crust with a sweet, spiced apple filling.
Imagine folding delicate layers of pastry in the artful origami style, it’s not only visually stunning, but it also ensures every bite is packed with flavor. Whether you’re a baking novice or a seasoned pro, this easy-to-make recipe is perfect for family gatherings, cozy afternoons, or impressing your guests at holiday parties. Plus, the versatility of this pie means you can customize it with your favorite apples or add a scoop of vanilla ice cream on top for the ultimate indulgence. Ready to get started? Let’s dive into this deliciously fun and satisfying treat!
Why You’ll Love This Recipe
If you’re looking for a dessert that’s both deliciously comforting and visually stunning, this Origami Apple Pie Before Fold is the perfect choice. Imagine the delight of creating a pie with a fun twist on the classic apple pie, a beautifully folded crust that makes each slice a treat for your taste buds and a visual treat.
Here’s why you’ll love making this recipe:
- Creative and Fun: The origami folding technique adds a unique, artistic touch to the pie, making it as fun to make as it is to eat. You don’t need to be a pastry expert to pull this off. The steps are easy to follow, and the result is so rewarding.
- Irresistible Flavors: With a blend of sweet, juicy apples, cinnamon, and a dash of nutmeg, this pie offers the perfect balance of warmth and spice. The flavors melt together beautifully in the oven, creating a filling that’s both comforting and unforgettable.
- Flaky, Golden Crust: The crisp, buttery crust is a showstopper. The folding method ensures each bite is flaky and satisfying, giving you the best of both worlds, a tender inside with a perfectly crisp exterior.
- Customizable: Not only is this recipe flexible when it comes to apple varieties, but you can also tweak the spices to suit your taste. Add extra cinnamon or even a bit of lemon zest for a zesty twist. You can even experiment with adding a caramel drizzle or a scoop of vanilla ice cream on top to elevate the experience.
- Perfect for Any Occasion: Whether you’re hosting a dinner party, gathering with family, or simply treating yourself, this pie fits every occasion. It’s sure to be a crowd-pleaser, leaving everyone impressed by both the taste and the intricate design of the crust.
With its delightful flavors, stunning presentation, and the joy of crafting something beautiful from scratch, this origami apple pie is bound to become your new favorite dessert to share with loved ones. Ready to get started? Let’s move on to the ingredients.
Ingredients

Now that you’re excited to get started, let’s take a look at the ingredients you’ll need to make this origami apple pie. The beauty of this recipe lies in its simplicity. You don’t need anything too fancy, just a few quality ingredients that come together to create magic.
For the Crust:
- 2 ½ cups all-purpose flour: This will give your crust the perfect texture, flaky and buttery. Make sure to measure the flour correctly for best results.
- 1 cup unsalted butter (cold, cut into cubes): Cold butter is key to achieving that light, flaky texture. Don’t let it sit out too long!
- ¼ cup ice water: Add just enough to bring the dough together. Too much water will make the crust tough, so add it gradually.
- 1 tablespoon sugar: A touch of sweetness to balance out the savory elements of the crust.
- 1 teaspoon salt: Enhances the flavors of the dough, creating that perfect balance.
For the Filling:
- 6 cups apples (peeled, cored, and sliced): A mix of tart and sweet apples works best. Try using Granny Smith for tartness and Honeycrisp for sweetness.
- ½ cup granulated sugar: This helps sweeten the apples without overpowering their natural flavors.
- 2 tablespoons brown sugar: Add a rich, caramel-like depth to the filling.
- 1 teaspoon ground cinnamon: The classic apple pie spice. Feel free to adjust depending on your love for cinnamon.
- ¼ teaspoon ground nutmeg: A pinch of nutmeg gives the pie a cozy, warm flavor.
- 1 tablespoon lemon juice: The acid helps balance out the sweetness of the apples and prevents them from browning too quickly.
- 2 tablespoons all-purpose flour: Helps thicken the filling and gives it that perfect, sliceable consistency.
For the Finish:
- 1 egg (beaten, for egg wash): This will give your crust that golden brown shine when baked.
- 1 tablespoon sugar (optional): A little sprinkle of sugar on top of the crust will make it sparkle beautifully when baked.
Tips for Choosing Ingredients:
- Apple Selection: Use a combination of apples for the best flavor. If you want a more tart pie, go for more Granny Smith apples, while a sweeter pie benefits from Gala or Fuji apples. Mixing apples adds texture and depth to the filling.
- Cold Butter: Ensure your butter is cold before adding it to the dough. This is crucial for creating that crispy, flaky texture in the crust. If you want to take it a step further, chill your mixing bowl too.
- Spice Variations: Feel free to get creative with the spices! Add a pinch of allspice or cloves if you like a bit more complexity in your filling.
With everything in place, you’re now ready to begin the fun part, assembling your origami apple pie! Just make sure to gather your ingredients ahead of time, so you’re all set to dive into the pie-making process with ease.
Step-by-Step Instructions

Now that you’re all set, let’s dive right into making this delicious Origami Apple Pie! Whether you’re a seasoned baker or a newbie in the kitchen, I’ve broken the steps down to make it as easy as possible for you to follow.
1. Preheat the Oven
Begin by preheating your oven to 375°F (190°C). This ensures the pie bakes evenly and gives you time to prep everything else.
2. Prepare the Apple Filling
- Slice the apples: Start by peeling and slicing about 6-8 medium-sized apples.
- Toss with sugar and spices: In a large mixing bowl, toss the apple slices with 1/2 cup sugar, 1 tablespoon cinnamon, and a pinch of salt. The sugar helps draw out the juice from the apples, and the cinnamon adds that perfect touch of warmth.
3. Make the Pie Crust
- Roll out the dough: If you’re using store-bought dough, this part’s easy! But if you’re making your own, roll out the dough on a lightly floured surface until it’s about 1/8 inch thick. Carefully line your pie dish with the dough, making sure to press the edges gently into the sides of the dish.
- Add the filling: Spoon the prepared apple mixture into the pie crust, spreading it out evenly. The apples should be heaping, as they’ll shrink a little while baking.
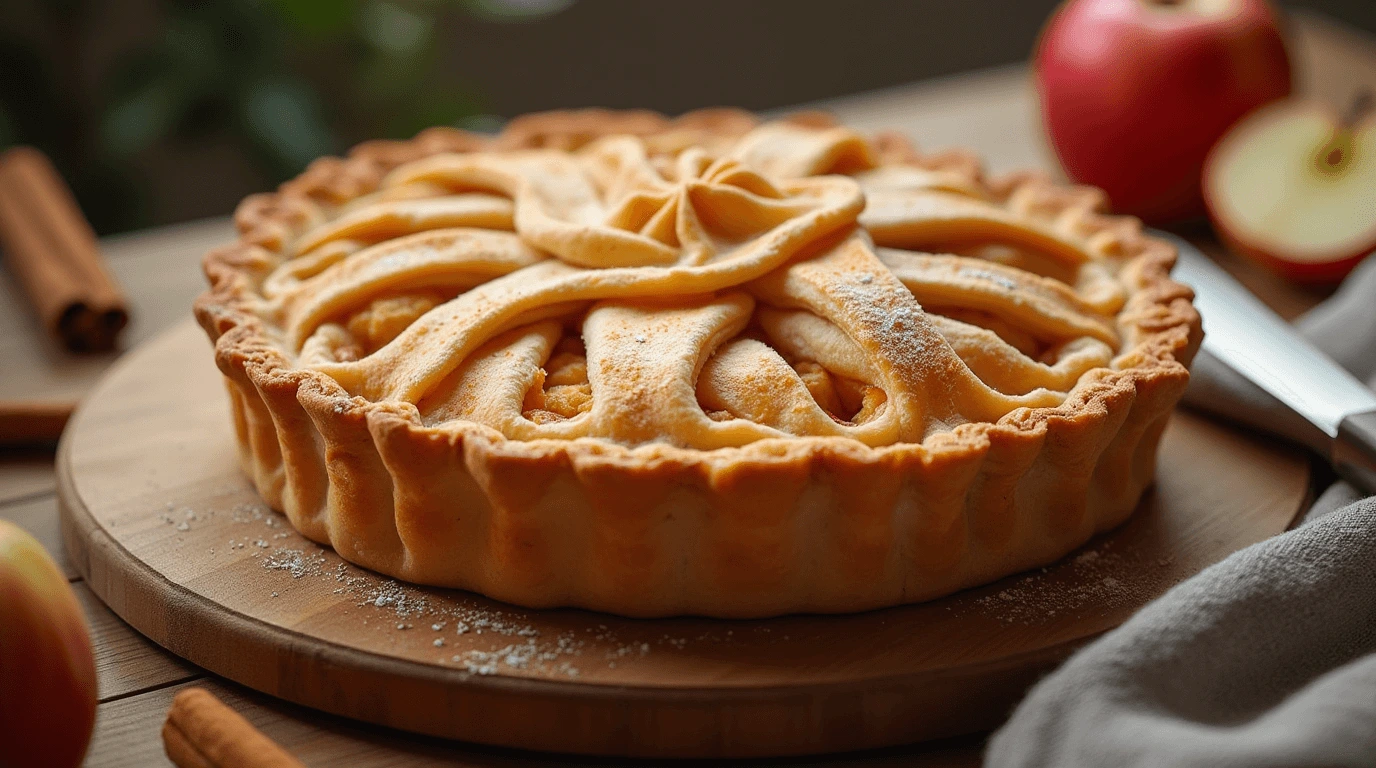
4. Create the “Origami” Folded Crust
- This step is where the magic happens! Take the edges of the dough and fold them gently over the apples, creating an overlapping pattern that resembles origami folds. This not only gives the pie a beautiful rustic look but also helps trap in the flavors while baking.
5. Bake the Pie
- Place the pie in the oven and bake for about 40-45 minutes, or until the crust is golden brown and the apples are tender. You may want to check halfway through and cover the edges with foil if they start to brown too quickly.
6. Cool and Serve
After baking, let the pie cool for at least 30 minutes. This allows the filling to set, so each slice holds together perfectly.
Pro Tip: For an extra touch of flavor, try brushing the top of the crust with a mixture of egg wash (1 egg whisked with 1 tablespoon water) before baking. This will give your pie a beautiful, glossy finish.
Bringing It All Together – Cooking Tips for Perfect Results
Now that you’ve gathered your ingredients and prepped everything, let’s dive into the cooking process! Here’s where you get to have some fun, and with these tips, you’ll be on your way to creating a dish that’s not only delicious but also memorable.
1. Preheat Your Pan or Oven
Before you even think about adding your ingredients, make sure your pan or oven is preheated. This allows for an even cook and ensures your food has the right texture. For stir-fries, heat your pan over medium-high heat for about 2-3 minutes before adding your oil. For baking, preheat the oven to the recommended temperature listed in the recipe.
2. Use Fresh Ingredients for Extra Flavor
While it’s tempting to use items that have been sitting in your fridge, fresh ingredients make a world of difference. Fresh herbs, vegetables, and proteins elevate the flavor and give your dish that extra pop. Not only will it taste better, but your kitchen will also smell amazing!
3. Don’t Rush the Searing Process
Searing your meat or vegetables is an important step to bring out deep, rich flavors. When cooking proteins, allow them to cook without moving them around too much. Let them sit for 3-4 minutes on each side to develop a beautiful, golden-brown crust.
4. Adjust Seasonings as You Go
Tasting your food as you cook is a simple yet crucial part of perfecting your recipe. Start with a little seasoning, and add more if needed. Keep tasting until you find that sweet spot. This is your dish, make it exactly how you like it.
5. Keep Your Cooking Tools Handy
If you’re following a recipe that involves multiple steps, gather all your tools beforehand. Whether it’s a wooden spoon for stirring or a timer to track your cooking time, being prepared will help everything run smoothly.
6. Let Your Dish Rest
Once your meal is done, give it a few minutes to rest before serving. This step is especially important for meats, as it allows the juices to redistribute. Your dish will be juicier and more flavorful as a result.
7. Garnish for Visual Appeal
A sprinkle of fresh herbs or a drizzle of sauce adds the perfect finishing touch to your dish. The right garnish can elevate your dish from good to great, making it Instagram-worthy in no time.
By following these easy steps and tips, you’re well on your way to mastering this recipe. Enjoy the cooking process and don’t forget to savor the final result. Happy cooking!
Serving and Storing – Make It Last and Shine
You’ve worked hard, and now it’s time to serve your delicious creation! Here are a few essential tips to ensure your meal not only tastes great but also stays fresh if you want to enjoy it later.
1. Plating Like a Pro
Presentation matters, and plating your dish beautifully doesn’t have to be complicated. A simple trick is to use a clean plate and focus on creating a focal point with your main ingredient. Add some garnish, like chopped herbs or a zest of lemon, for that perfect finishing touch. You’ll be amazed at how something as simple as a sprinkle of parsley can make your dish pop!
2. Pair It with the Right Sides
A great recipe often pairs perfectly with a side dish that complements the main event. For example, if you’ve made a rich pasta dish, a light salad or roasted vegetables can balance things out. Think about texture and flavor contrast to elevate the overall experience.
3. Cool Down Before Storing
If you have leftovers (or plan to make ahead), allow your dish to cool to room temperature before storing it. This helps prevent condensation inside the storage container, which could affect texture and flavor. Store your meal in an airtight container for the best results.
4. Freezing for Later
Some dishes freeze beautifully for later use. For meals like soups, casseroles, or stews, simply portion them into freezer-safe bags or containers. Don’t forget to label them with the date, that way, you’ll know exactly when it’s time to eat it again. When reheating, make sure to do so slowly over low heat to preserve the flavors.
5. Reheat with Care
When reheating your dish, aim for even warming. You can add a small splash of water or broth to help keep the dish moist, especially for pastas or rice-based dishes. Microwaving is fine, but consider using the stove to reheat more delicately for the best results.
6. Take Photos – Show Off Your Hard Work!
And last but not least, if you’ve created a meal worth sharing, take a picture! A good photo can help you remember your recipe or inspire others to try it. Make sure to use natural light and avoid clutter in the background for a clean, appetizing shot.
By following these steps, you’re not only serving a fantastic meal, but you’re also setting yourself up for success in the kitchen. Whether you’re enjoying your dish now or saving it for later, these tips will help you make the most of your cooking!
Conclusion
This Origami Apple Pie Before Fold is a delicious, visually stunning dessert that’s easy to make and sure to impress. With a flaky crust and spiced apple filling, it’s a perfect balance of flavor and texture. Get creative with your folds and enjoy the process. Happy baking!
FAQs
Here are some common questions about making the perfect Origami Apple Pie, answered to ensure your baking experience is as smooth as pie.
Is it okay to use a pre-made pie crust for this recipe?
Absolutely! If you’re short on time or prefer a simpler approach, using store-bought pie crust is perfectly fine. However, if you want that homemade touch, feel free to use the recipe’s homemade crust for an extra layer of flavor.
What apples are best for this pie?
For the perfect balance of sweetness and tartness, opt for a mix of Granny Smith apples and Fuji apples. Granny Smith adds a tart kick, while Fuji apples bring a natural sweetness to the pie.
What can I do to keep my pie crust from becoming soggy?
To keep your crust crisp, pre-bake it for a few minutes before adding the apple filling. You can also brush the crust with a thin layer of egg wash before baking to create a protective barrier.
Can I make this pie ahead of time?
Yes, you can! You can prepare the pie the day before and refrigerate it until you’re ready to bake. Just remember to let it cool completely before storing it in an airtight container.
Can I freeze this pie?
Definitely! If you want to save it for later, you can freeze the pie either before or after baking. Just make sure to wrap it tightly in plastic wrap and then foil to prevent freezer burn.
What should I serve with this pie?
A scoop of vanilla ice cream or a dollop of whipped cream takes this pie to the next level. For something a bit more indulgent, a drizzle of caramel sauce pairs beautifully with the warm, spiced apples.