Table of Contents
Why You’ll Love This Chicken Spring Roll Recipe
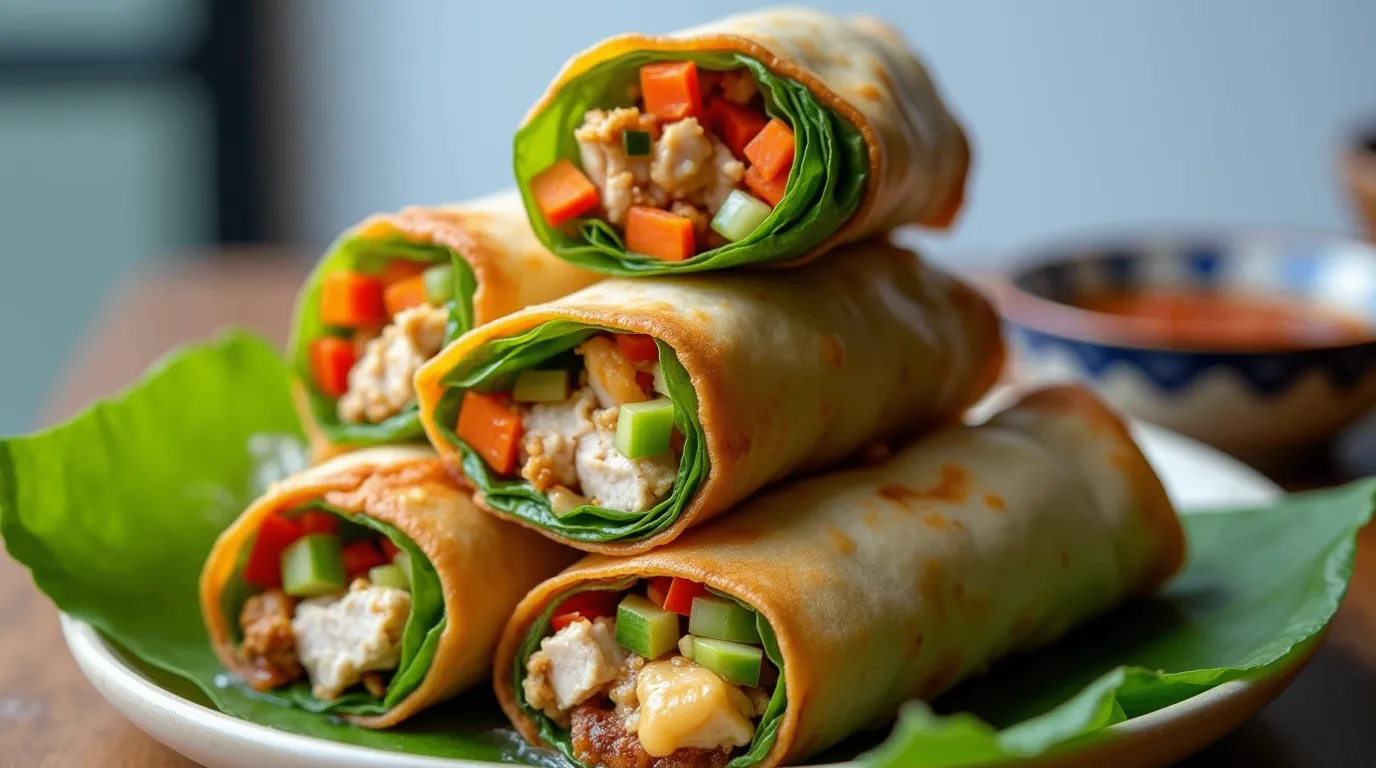
This Chicken Spring Roll Recipe is perfect for anyone who loves a tasty, easy-to-make snack or appetizer, With its crispy golden wrapper and savory chicken filling, it’s a dish that combines simple ingredients with big flavor. Whether you’re preparing a meal for yourself or hosting friends, these spring rolls are sure to impress.
Here’s why you’ll love them:
- Quick and Simple: You don’t need hours in the kitchen to make these spring rolls. With just a few easy-to-follow steps, you’ll have crispy, delicious rolls in no time.
- Crispy and Flavorful: The exterior is perfectly crispy, while the tender chicken inside adds a satisfying texture and savory taste. It’s a bite of crunch and flavor in every piece.
- Customizable: Want to add some spice or swap in veggies? This recipe is flexible! Add your favorite ingredients to create your own signature spring roll.
- Great for Meal Prep: Make a batch in advance, and they’re ready to snack on throughout the week. You can even freeze them for later.
With these spring rolls, you’re not just making a meal, you’re creating a delightful experience that’s sure to bring smiles all around. Perfect for any occasion, this recipe will quickly become a favorite.
Ingredients & Substitutions for Chicken Spring Rolls
Making this Chicken Spring Roll Recipe is a breeze with simple ingredients that are easy to find and customize based on your preferences. Here’s what you’ll need to create the perfect batch of crispy, flavorful spring rolls:
Main Ingredients:
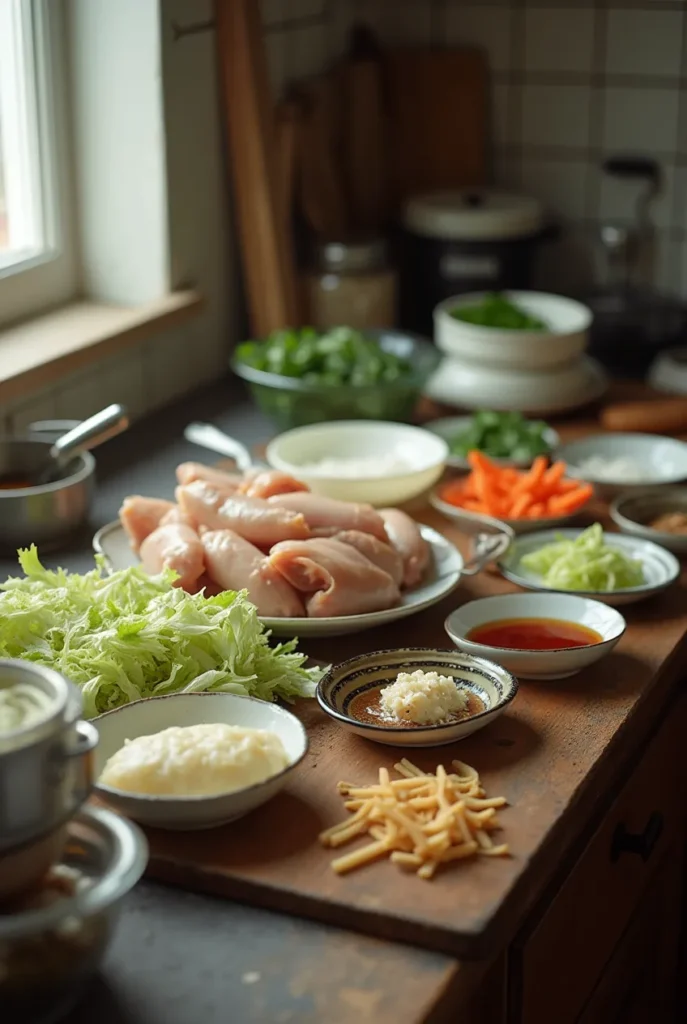
- Chicken Breast (1 pound): Cooked and shredded chicken breast is the base of these spring rolls. If you’re looking for a lighter option, skinless chicken breast works well, and rotisserie chicken can also save you time.
- Spring Roll Wrappers (12-15 wrappers): These are the crispy outer layer of the spring roll. You can typically find them at any Asian grocery store or in the international section of your supermarket.
- Carrots (1 cup, julienned): Fresh, crunchy carrots bring a slightly sweet flavor to balance the savory filling. You can substitute with bell peppers or zucchini for a different texture.
- Cabbage (2 cups, shredded): This gives the spring rolls an extra crunch. If you’re not a fan, try swapping it out for spinach or kale.
- Green Onions (1/2 cup, chopped): Green onions add a fresh, mild onion flavor. In a pinch, you can replace them with shallots or even leeks.
- Garlic (2 cloves, minced): Garlic is key for a fragrant, flavorful filling. You can substitute with garlic powder if you’re in a rush.
- Soy Sauce (2 tablespoons): This adds the signature umami flavor. If you’re looking for a gluten-free alternative, use tamari sauce.
- Sesame Oil (1 tablespoon): A little sesame oil goes a long way in enhancing the flavors. If you don’t have sesame oil, you can use vegetable or canola oil instead.
- Rice Vermicelli Noodles (1/2 cup, optional): These soft noodles can be added for extra texture and heartiness. You can skip them for a lighter roll, or swap with glass noodles or even quinoa.
Substitutions:
- Chicken: If you want a different protein, ground turkey, shrimp, or tofu can work beautifully.
- Cabbage: Feel free to try shredded lettuce or baby spinach instead for a softer bite.
- Rice Vermicelli: For a twist, you can add cooked quinoa or thin rice noodles.
With these simple ingredients and a few substitutions, you can make this Chicken Spring Roll Recipe your own, no matter your dietary preferences or what you have in the pantry.
Step-by-Step Chicken Spring Roll Recipe Instructions
Prepare the Chicken
Begin by cooking your chicken. If you’re using chicken breasts, season them with a pinch of salt and pepper, then cook them over medium heat for about 6-7 minutes on each side, or until fully cooked through. Once the chicken is done, shred it using two forks or chop it into small pieces. This will form the heart of your filling.
Prep the Veggies
As the chicken cooks, get your vegetables ready. Slice the carrots into thin strips and shred the cabbage. Dice the green onions and finely chop the garlic. To make assembling the rolls easier, place each ingredient in its own bowl.
Cook the Filling
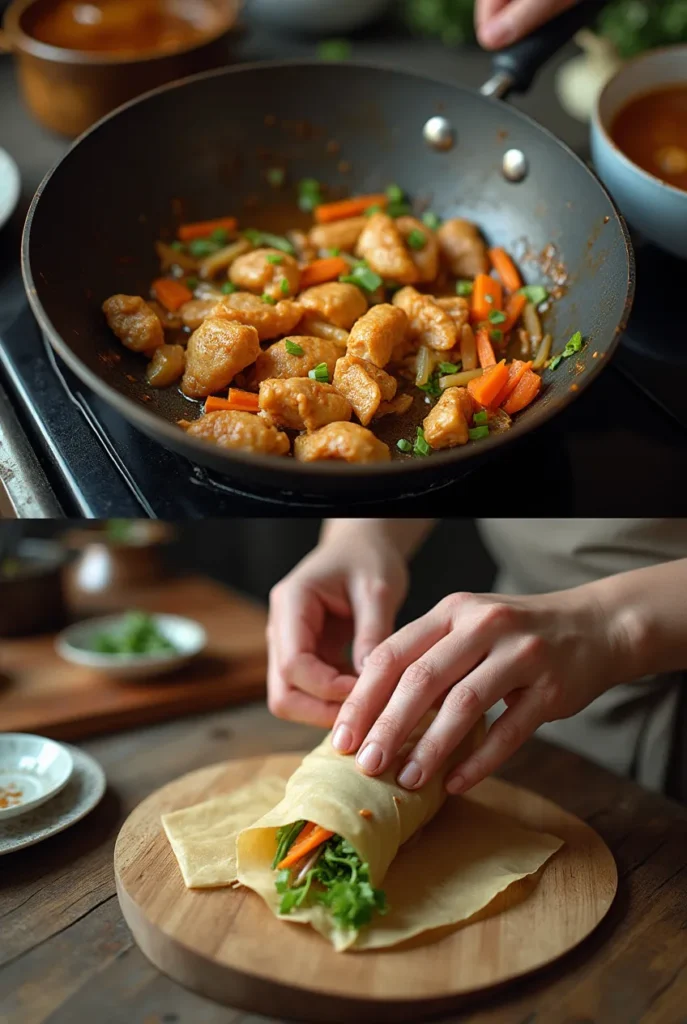
In a large skillet or wok, warm a tablespoon of sesame oil over medium heat. Once hot, add the garlic and sauté for about 30 seconds, allowing it to release its fragrance. Then, toss in the carrots, cabbage, and green onions. Stir-fry the mixture for 3-4 minutes, ensuring the vegetables stay crisp-tender. Stir in the shredded chicken and soy sauce, combining everything well. Let it cook for an additional 2 minutes to blend the flavors. If using rice noodles, add them now and allow them to warm. Once everything is fully mixed, remove the pan from the heat and let it cool.
Assemble the Spring Rolls
It’s time to put together the spring rolls. Begin by filling a shallow dish with warm water. Gently dip one spring roll wrapper into the water for about 5 seconds until it softens and becomes flexible. Place the wrapper on a flat surface. Add a small spoonful of the chicken and vegetable mixture to the center, be careful not to overfill. Fold the sides of the wrapper inward over the filling, then roll it up tightly, sealing the edges with a bit of water to keep it secure.
Fry the Spring Rolls
Pour about 2 inches of vegetable oil into a frying pan and heat it over medium heat. When the oil reaches approximately 350°F, gently add the spring rolls to the pan, frying them in small batches for 3-4 minutes on each side, or until they’re golden brown and crisp. Once done, transfer the spring rolls to a plate lined with paper towels to drain any excess oil.
Serve & Enjoy
Serve your homemade Chicken Spring Rolls with a dipping sauce of your choice, like sweet chili or soy sauce. They’re perfect for any occasion, whether as a snack, appetizer, or even a light meal.
Enjoy making these delicious rolls and sharing them with your friends and family. With this chicken spring roll recipe, you can create a crispy, flavorful snack that everyone will love.
Variations to Try with Chicken Spring Roll Recipe
While the classic chicken spring roll recipe is delicious on its own, there are plenty of ways to switch things up and add your own twist. Here are a few fun variations to inspire your next batch of spring rolls:
Spicy Chicken Spring Rolls:
For those who enjoy a bit of heat, add some sliced chili peppers or a dash of hot sauce to the chicken filling. A sprinkle of red pepper flakes can also give it that extra kick.
Vegetarian Spring Rolls:
Keep the same crispy texture but swap out the chicken for tofu or tempeh. You can also load up on extra veggies like bell peppers, mushrooms, or spinach for a satisfying meat-free option.
Asian-Inspired Spring Rolls:
Try adding some fresh herbs like cilantro or mint to the filling for a burst of freshness. A little grated ginger can also add a zingy flavor.
Sweet and Savory Spring Rolls:
Add a tablespoon of hoisin sauce or a drizzle of honey to the filling to create a delightful balance of sweet and savory flavors. This variation pairs wonderfully with a sweet chili dipping sauce.
No matter which variation you choose, these spring rolls will surely impress with their crispy texture and flavorful filling. Feel free to get creative and experiment with different ingredients to make this chicken spring roll recipe your own.
Tips for Wrapping Chicken Spring Rolls Perfectly
Wrapping spring rolls might seem tricky at first, but with a little practice, you’ll be a pro! Here are some tips to ensure your chicken spring rolls turn out perfectly every time:
- Soften the Wrapper Just Right: When dipping the spring roll wrappers into warm water, make sure not to soak them for too long. A few seconds is enough to make them pliable without becoming too soft and tearing. If you accidentally over-soak one, just set it aside for a few seconds to firm up again.
- Don’t Overstuff: It’s tempting to add a lot of filling, but overstuffing the spring roll can make it harder to wrap and increase the risk of it bursting open while frying. Stick to a small amount of filling, just enough to give it a satisfying bite.
- Seal the Edges Well: After rolling up the wrapper, make sure to seal the edge tightly by lightly wetting it with water. This ensures the spring roll stays intact while frying.
- Use a Clean Surface: Always work on a flat, clean surface when assembling your spring rolls. This makes the wrapping process smoother and more controlled.
By following these simple tips, your chicken spring rolls will be neat, crispy, and ready to enjoy.
Storage & Reheating Tips for Chicken Spring Rolls
To keep your chicken spring rolls fresh, follow these simple storage and reheating tips:
- Refrigeration: Store leftover spring rolls in an airtight container in the fridge for up to 3 days.
- Freezing: For longer storage, freeze uncooked spring rolls on a baking sheet. Once frozen, transfer them to a freezer bag and keep for up to 1 month.
- Reheating: Reheat spring rolls in the oven at 375°F (190°C) for 10-15 minutes until crispy. Reheating in the microwave is not recommended, as it can cause the wrappers to lose their crispiness and become damp.
Now, you can enjoy these delicious chicken spring rolls anytime.
Serving Suggestions for Chicken Spring Rolls Recipe
Chicken spring rolls are a flexible and tasty dish, ideal for a wide range of occasions. Here are some creative ways to serve them and take your meal to the next level:
- Dipping Sauces: Pair these crispy rolls with sweet chili sauce, soy sauce, or a tangy peanut sauce for an added burst of flavor.
- Fresh Salad: Serve with a crisp cucumber or mixed greens salad for a refreshing contrast to the crunchy rolls.
- Rice Paper Wraps: For a fun twist, try rolling them in fresh rice paper with a mix of veggies and herbs, making for a light, healthy bite.
- Side Dish: Chicken spring rolls are fantastic with fried rice, noodles, or stir-fried vegetables as a complete meal.
These simple yet tasty options will make your chicken spring roll recipe even more enjoyable.
FAQs About the Chicken Spring Roll Recipe
How to make Chinese Chicken Spring Rolls?
Making Chinese chicken spring rolls starts with preparing the filling. Stir-fry chicken with vegetables like cabbage, carrots, and mushrooms until tender. Let the filling cool slightly. Then, place it in a spring roll wrapper and roll it tightly, folding in the edges. Heat oil in a pan or deep fryer and cook until golden and crispy. Serve with a tasty dipping sauce.
What flour are spring rolls made from?
pring roll wrappers are typically made from rice flour or wheat flour. Rice flour wrappers are thinner and commonly used in fresh spring rolls, while wheat flour wrappers are used for crispy fried versions. Both types give a unique texture to your rolls, so choose based on your preference.
What sauce for spring rolls?
Spring rolls go wonderfully with a variety of sauces. Classic choices include soy sauce, sweet chili sauce, and hoisin sauce. For an extra touch, you can mix peanut butter with a bit of soy sauce and lime juice for a creamy dipping option.
Can you bake spring rolls instead of frying?
Yes! Baking is a healthier alternative to frying. Brush your spring rolls with a bit of oil before placing them on a baking sheet. Bake at 375°F (190°C) for 20-25 minutes or until they turn golden and crispy.
How do you keep spring rolls crispy?
To keep your spring rolls crispy, serve them immediately after frying. If you’re making them in advance, place them on a wire rack to prevent sogginess. For extra crunch, avoid overstuffing them and use thin wrappers.
What pastry is used for spring rolls?
Spring rolls are typically made with thin, crisp pastry wrappers, either rice or wheat-based. Rice paper is often used for fresh rolls, while wheat flour wrappers are popular for fried spring rolls.
How to fold a spring roll?
To fold a spring roll, start by placing the filling in the center of the wrapper. Fold in the sides, then roll tightly from the bottom up. Be sure to seal the edge with a bit of water to keep it from unraveling during cooking.